How to Stop the Crop on Your Instagram Photos

Have you noticed that Instagram can be a little square?
Let’s be honest, our photos just don’t always fit perfectly into that ever so loved, square shape. When uploading photos to Instagram, all photos need to be cropped into this old fashion Polaroid imitation.
However, this can be quite frustrating at times, especially when cropping means the loss of part of the image you want to express. While cropping is helpful when you want to cut out an electrical socket or a photo bomber in the background, it can also leave you feeling limited while expressing your artistic style.
Like all things, there are ways around this to help make sure each and every photo you are posting is exactly the way you want it portrayed. Here are six steps on how to stop the crop on your Instagram photos.
6 Steps to Stop the Crop on Your Instagram Photos
Step One – Get an App
Download a third party app. Here are a few that you can download:
- Squaready
- Nocrop
- Studio Design – Available for both iPhones and Android users
- For Android users, you can use Square Camera
Most apps offer a free version with ads, but they do offer an upgrade version if you are willing to pay. For the sake of this tutorial, I will use the Studio Design Instagram app by Overlay Studio Inc. to help give a demonstration of how we can stop the crop.

This application was recommended by Hillary Rushford, an Instagram pro. What makes Studio great is that it offers not just the ability to edit the crop, but it allows you to edit your photos with watermarks, text, and filters. The image will save directly to your phone and upload exactly how you edited.
Note: If you have tried editing directly from your photos on your phone you might have noticed that all those edits get lost when uploading to Instagram. Using an application like Studio will save your hard work.
Step Two – Upload
Upload your photo to the application. You can take a photo directly from the application or use a photo that you have saved to your phone.
Step Three – Position Photo
Position the photo wherever you want it to fit. You can zoom in or out depending on what you want to highlight.
The photo I am using here as an example shows how when we use Instagram directly, the cropping doesn’t work great.
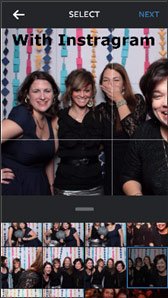
For this picture, Instagram cuts off one person or the other depending how I move the photo. All four people in this picture do not fit perfectly into that perfect square.
Now let’s take a look at how it looks when you upload the photo to Studio. The app gives you the option to zoom in or out using your fingers. When pulling the photo out, you can see that I will be able to fit all the girls into the photo square. This will create some white space, or a border along the top and bottom of the photo. Using the Studio apps helps avoid the crop and will allow you to upload into Instagram with the picture you want to show.

Step Four – Edit Photo
 When using Studio, you can add filters, text and watermarks to your photo. With all the options they provide it can help spur on some creativity lying in wait. From fun words to creative shapes, you can make some fun photos. The best part is that the edits you make to your photos will be saved and ready to go when you upload it to your Instagram account. Unlike your phone app, you will not lose your edits.
Step Five – Save Image
Take the photo that you have created and save it to your photos. The application allows you to upload it directly to whatever social media site you would like. It is recommended to go ahead and save your photo to your phone and then upload your newly edited photo to Instagram. If you upload it directly from your phone, it will have a caption that runs across the bottom of the photo sharing where you edited it from.
Step Six – Upload To Instagram
 Open up your Instagram application and upload your newly edited photo that you created in your Studio application. It will look exactly how you edited. You can add the Instagram filters in if you would like, or you can upload it as is. Once you have uploaded the photo, add your caption and post.
While Instagram is a fun photo sharing site, it has its limitations. At first glance, it might feel like it might not be the social venture for you. Knowing how to work your way around those limitations might help ease some frustrations and help you start utilizing one of the fastest growing social media sites.
Whether you are a photographer and want to show off your amazing skills and panoramic views, or just a person trying to fit all the girls in your crew into the photo without cutting someone’s head off, using an editing app to help you avoid the crop is going to be helpful. Studio is just one of many applications that will help you accomplish the no crop while giving to a lot of different options to help make your photos look great.
Instagram Contest
We would love to see the photos you are creating and sharing on Instagram so much so that we are creating a fun little Instagram contest. To enter, follow us on Instagram at @rrwebdesign, upload a photo, tag us in your photo, and add the hashtag #rrwebdesigncontest.
We will pick one of your photos based on the criteria listed above. We will post the winner on Thursday, March 18th and highlight your post on all our social media sites with your permission.
The prize will be bragging rights and of course, some extra exposure. Make sure to post your picture by next Wednesday, March 17th.
Take Away
Now you know how to stop the crop with a little help from Instagram apps. What part of this did you find the most helpful? Are you planning to enter a photo into our contest?
I would love to hear your thoughts and any other questions you have in the comment section below. Your feedback is always appreciated.
The tools listed in this article are for informational purposes. I am not being or is R & R Web Design LLC compensated in any way for the tools listed in this article. In addition, I am not, nor is R & R Web Design LLC, an affiliate in any form.